The 2nd day in my [HTML] classes, This section will allow you to learn the following, How to add a table to your webpage, How to add images and text and also how to create a navigation bar to allow visitors to wander round your website.
Hello (and welcome back if your following on from the 1st tutorial :p)
Ok so last time we didn't do too much except for adding a title to the webpage we were creating so that was a little too small for a tutorial but hell we all have to start somewhere right? :P
Ok so in this first step I will be teaching you how to add a table to your webpage as their use is so much more than just a table, They help you correct format your webpage so that it looks nice and neat too, You can also add images and text and even sound (with a little extra work) to these tables :)
Ok so to begin we need to add a table "element" to your webpage, An element put simply is an object on your website that provides a function, Usually operating something in the background that the user has no control over themselves.
So to add a table to your webpage go to "insert" on the tabs at the top of the application you are using and select table, Then you will be presented with a menu that asks you to select the size of the table you want to create, Personally I like to start off with a 3x3 table and add extra to it later on if I need to. (In Notepad you will have to type the code to perform this function manually or copy + paste the code below)
(Ensure that this code is copy + pasted in between the two <body> </body> on your webpage because otherwise nothing will show up when you save and open your webpage.)
Ensure that this code is copy + pasted in between the two <body> </body> on your webpage because otherwise nothing will show up when you save and open your webpage.
As you will notice there are several html syntax's used inside the < > bracket's (web word's that tell a browser what it needs to create), Syntax is a common word used in EVERY type of coding language not just HTML so do not get confused with those syntax's as something will go wrong. They are normally referred to as "tag elements"
These "tags" are as follows and I will explain each of them:-
opening tag:-

<table> this tells a browser that it needs to create a table to store some information.

Closing tag:-

</table> this tells a browser where it needs to stop creating the content for a table, You need an opening tag <table> before you can use this closing tag otherwise you will get errors on your webpage when you go to get it validated.
Opening Tag:-

opening tag:-

<tr> this tells a browser that it needs to create a row in the table to store some information.

Closing tag:-

</tr> this tells a browser where it needs to stop creating the content for a table row essentially ending that row to editing.
Opening Tag:-

opening tag:-

<td> this tells a browser that it needs to create a density (cell) value in the table to allow it to store additional information.

Closing tag:-

</td> this tells a browser where it needs to stop creating the content for a table row essentially ending that cell to editing.
Next we will need to set the width and height of each cell or row (You do not need to set it in each row if the values are the same in each cell (some would call this localized editing, Whereas editing a row would be classed as regional editing, Global Editing on the the other hand would be the value of every single cell on that page, This would normally be stored in a .CSS file or within the <head> tag, We will do more on that tage later).
td element additions (a quick explanation on each element)
border="XXX"
Add's a border around the cell that you include this element in. Don't have a higher XXX value of 12 otherwise it looks naff.
cellpadding="XXX"
Add's a padding inside of the cell you are using so that the text is not near to the edge of the cell.
cellspacing="XXX"
Add's a space between each of the cell's in the row you are manipulating with this element.
width="XXX"
Set's the widthof the cell you are adding the element to allowing you to add more content to the cell.
height="XXX"
Set's the height of the cell you are adding the element to allowing you to add more content to the cell.
background="file path goes here"
This can be used to tweak the GRAPHICAL content of the cell :)
All of these can be added into the same element if you wish as well like so:-
Adding text and aligning it to the correct or wanted position :p
An easy enough one to get your teeth into, Alignment is one of the most useful tools to a web developer as it allows you to place wherever you want to place it inside of your cell.
Look at the example's below:-
HTML 4 Compliant
<align="left">

place the text of the left hand side of the box (this will take into account
any cell padding you may have as well

</align>


<align="right">

place the text of the right hand side of the box (this will take into account
any cell padding you may have as well

</align>


<center>

places the text in the absolute center of the cell.

</center>
HTML 5 Compliant
text-align: center;
^-- that is a semi colon after the word "center", This is VERY important that you put this after that word otherwise it will not work!!
text-align: left;
^-- that is a semi colon after the word "left", This is VERY important that you put this after that word otherwise it will not work!!
text-align: right;
^-- that is a semi colon after the word "right", This is VERY important that you put this after that word otherwise it will not work!!
vertical-align: top;
^-- that is a semi colon after the word "top", This is VERY important that you put this after that word otherwise it will not work!!
This will allow you to stick the text to the top of the cell you are aligning.
vertical-align: bottom;
^-- that is a semi colon after the word "bottom", This is VERY important that you put this after that word otherwise it will not work!!
This will allow you to stick the text to the top of the cell you are aligning.
^<-- just in case you didn't realise the Semi-Colon is extremely important lol :)
[ASSIGNMENT] Your first test [must edit step 2 first]
Ok so you have learned the basics of how to layout a website, Now I would like to give you an Assignment to see how much you actually took in during these past 2 tutorials and that would be the following:-
Create a simple Web Page with:-
1 cell for the title image on the 1st row
3 cell's for 2nd row, One on the left saying Navigation Menu (Cyan in color) which must be aligned to top,
One in the center showing a paragraph about why you love the engine you are currently using and the last cell on the right saying why you love this site (RMU) in 15 words or less.
Add a 12 pixel border around the top row (title) and a title image.
Add a 4 pixel border to row 2 (and 3 if you want to complete the bonus objective)
I would also ask that you use the following resources in the link provided below just for easier use :)
add a 3rd row with 3 cells and write whatever you like in those paragraphs provided it contains some information about one of your favourite hobbies. No less than 40 words in each column/cell.
Add some Nav Link # messages to the Nav Menu and make sure it is one link per line (Note: You do not need to add actual link's, Just the words Nav Link #, Will suffice where # = the number of the link i.e 1, 2, 3 etc.)
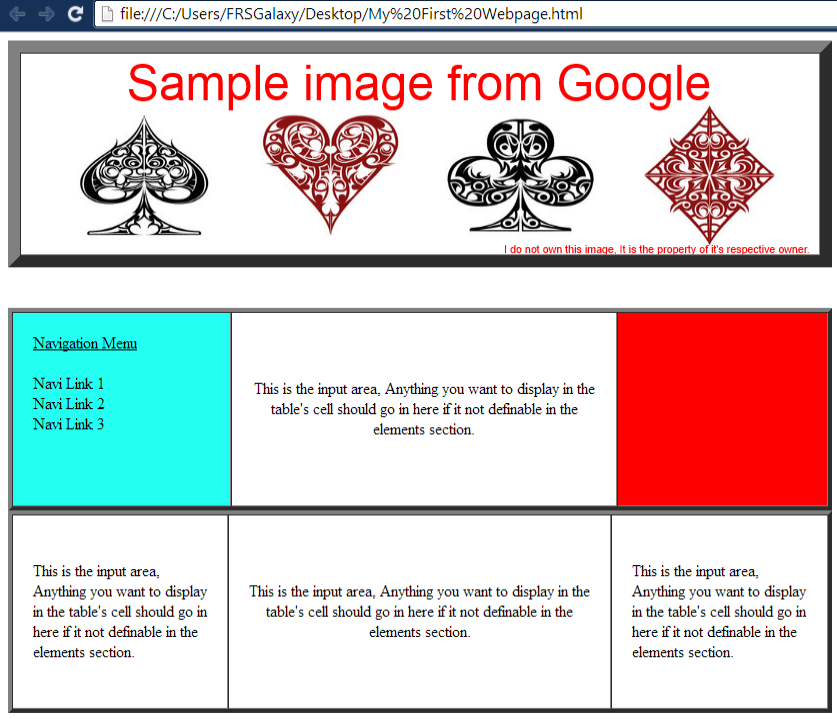
Once you have finished the above Assignment it should look like the following if you completed the optional objective too.
P.S the row width is not greater than 824 pixels :)


No Comments