How to create an "animation" of a character falling down through spriting.
A little information before starting
Before I start what I am probably falsely terming a "tutorial"...
This a walkthrough on how to make a falling "animation" for your character. I don't like calling it an animation because there's already the animations in the database, which isn't what you need to show something like your character falling down. Hence, quotes.
Let me bore you with a little ramble. Making your character do a simple action like falling takes some extra work. There's no command in RMXP that will automatically make your character fall. It will not draw the motion out for you. The engine does what it's told, nothing more and nothing less. Unless you have some sort of script like Drago's Breath Effect that also applies to things like falling, you will have to do a little manual labour.
What we're going to be using: An image editor... you can use something like MS Paint, or Photoshop if you're feeling fancy. Your RPG Maker engine of choice... Mine is RMXP. The Set Move Route Command... integral to your falling animation.
That being said, there are probably 1000 ways to do this. But I'm showing only one of them... for example, if the character gets knocked into and goes flying into the air. It'll require a little more eventing than just falling in place, so if you do this you can do the latter.
Setting up.
Now, the actual tutorial: the way I'm doing this is through a little sprite editing.
Open up your character's sprite in your image editor. Make a copy of the image so you can have a backup if you screw up... which I tend to do a lot.
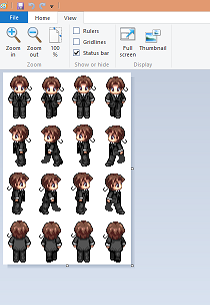
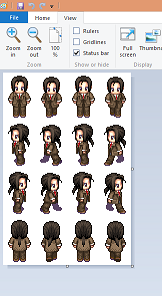
(I'll be doing two versions--side and front, to demonstrate. The one in the black suit will be the front one, the brown suit guy will be side.)
By the way, it doesn't matter where you place your edits on the sprite sheet. I'll be using the "Change Graphic" in the Set Move Route command, so you can select any position from any sprite sheet. For this tutorial's sake, I'm putting them in with a bunch of other edits I've made already.
Spriting - Front version
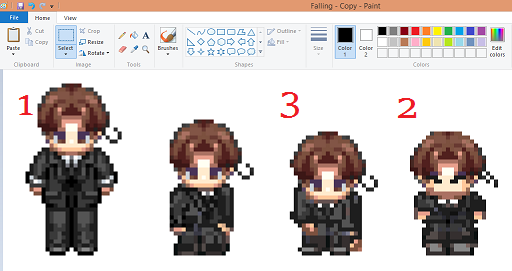
First step. Like drawing animation, it's best to think of where your sprite will end up (on the floor, most likely) and afterwards make the "in-between" frames. Make the fallen sprite first, referencing your character sprites.
Second step. Then, think of how you want your character to fall--the motion they will experience between standing and falling--and make that pose.
#1 -original pose. #3 Did this one first. Labelled sprite is when my character has already hit the floor. #2 Did it after #3. Labelled sprite is showing is the character while he's falling.
(Ignore the one between #1 and #2, that's just a sprite of when my character starts standing up again.)
Also, work from the same row as you want your falling animation to be viewed. If your character is going to be facing frontwards, then work on the first row. If he's facing left while he falls, work on the second row. You can reference the sprites more easily that way, since you'll be zooming in and out a lot while you sprite new poses.
That's really all you need to just show the character has fallen. If you want to get extremely basic, you don't even need the "middle" position.
Spriting - Side version
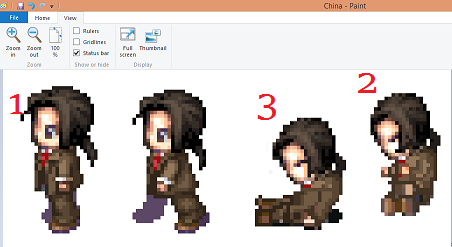
Let's apply the same to brown suit guy.
He's standing perfectly upright in #1. By #2, he's taken a hit and went flying. #3, he's officially out cold.
I worked it by #3, then #2. Do it whichever way you want, but this works well for me, like drawing animation.
Finish the start and the end, then establish the middle. Often you don't need more than that.
Get it into the engine.
Polish up your sprites on the sheet. Make sure they don't have the same name as another file in the engine, then import them to the database.
If it's not perfectly aligned, that's fine. Most of the time, I find out how it looks while playtesting, then I fix it after that.
Note that they're unnaturally in sync with each other... The guy in the black suit is actually waiting for the guy in the brown suit to change graphics well. This isn't something I'll be fixing in this tutorial, since I'm just trying to show you how to make your character fall. Feel free to toy around with the event afterwards and fix yours on your own if you're making something like this.
We'll reference it as we go over the next step, which is eventing this scene.
Eventing.
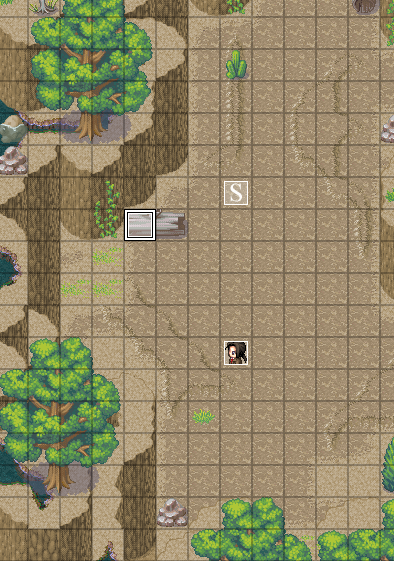
Let's put these two guys on the map--they'll knock each other and both fall down, so we can see the two sprites in action. For reference, I named brown suit guy's event "China".
Set up an event.
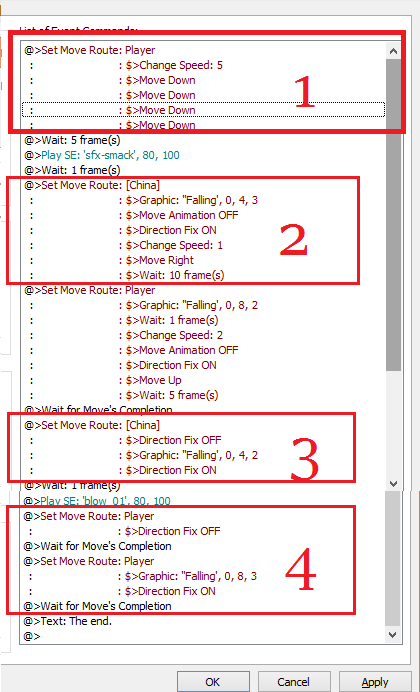
1. I set it up for the player to move towards "China".
(Between 1 & 2, waited five frames, giving time for player to finish moving. Inserted noise for them hitting each other.
2. Switched to the graphic that contains the "middle" animation for "China". Because this was on a separate sprite sheet than his normal one, I turned off move animation. To make it look like he's been knocked a fair distance to the right, I turned on Direction Fix to keep him in that pose. Then moved him to the right. This way, it looks like he's in midair.
(Between 2 and 3, I did a similar thing for the player. Set the graphic to his "middle" animation, turned Move Animation OFF, Direction Fix ON, then moved him back. It looks like he's falling backwards.)
3. Turn your Direction Fix OFF. Change to "China's" fallen pose. Then I turned it on again, because he'll stay that way a while in my game.
(Between 3 and 4, the sound of them landing.)
4. The player has something similar. Turned off their direction fix, then changed their graphic to their landing position and then turned their Direction Fix ON again.
I made a mistake in 4, it should be one Set Move Route, but instead I put it separately... don't know why. And at the end, I just put the text there so that we can have a placeholder, then the event won't repeat itself.
Wrapping it up.
And there's your finished animation. You can play with the events any which way you want, but basically I was just outlining the best way to go about making the sprites and how one might set them up.
Not to mention this is for only one example of a falling motion--you might not need to move your character at all if they're simply falling in place and not being knocked through the air. In that case, probably half the steps in this Set Move Route as shown in the tutorial are null.
There are tons of ways to do this, and I just showed one example. So go out and explore them!
Don't trust half the posts you see here. Some of them are my partner's and some are mine. Background on us, since for a while she posted here (and yes--I have permission to post this information):
I'm Naoto. Sixteen years old, Male. Germany. A coffee addict with a practically nocturnal schedule. Co-developer on the Insanitalia Game Project. I use this account now.
And then there's Kitsuki. Fifteen years old, female. USA. Also a coffee addict. The creator of our Hetalia fangame, Insanitalia. She's abandoned this account since a few months.
... I feel like there should be a way to delete posts, since there's her and then there's me.


1,349 Posts
973 Points
This is cool. I'm not much of a spriter bit I'm gonna try to make some for my character sets.
170 Posts
629 Points
Tbh I'm not much of a spriter, either. Mine look pretty bad.
94 Posts
621 Points
I might try this for my new game! Thanks!
1222222