Hi guys and girls.Today we're going to learn to draw.DON'T PRESS THAT BACK BUTTON! I will walk you through it and we are starting with a relatively easy one.We're going to learn to draw one of those character profile pics.You know one of those pictures of your character on the bottom of your screen that your HP/SP sits under?Yeah we're going to draw one of those. The things you will need for this tutorial are:
. A Pencil - I use a mechanicle drawing pencil but a regular #2 pencil will do just fine. . Drawing Paper- Nothing fancy is required.Mine I got from wal-mart a sketch pad that cost me like $4 . An Eraser - Magic Rub erasers are pretty good but they do tend to leave a lot of eraser shavings in their wake.The white erasers work great as well and they are nowhere near as messy.The red ones tend to smear. .A Pen - I use a micron .01.You can get them from any office supply or art store but they are a optional item they are not necessary to do this. .Imagination and a little patience
With all that out of the way let's get started
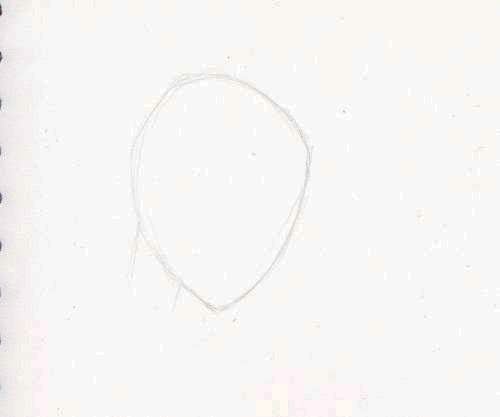
Draw a Egg Shape
The first step is to a draw a oval.Just think "like a egg" and you'll be fine.The important thing to remember when doing guides is to do them light.If you do them lightly they are that much easier to erase when the time comes for it.
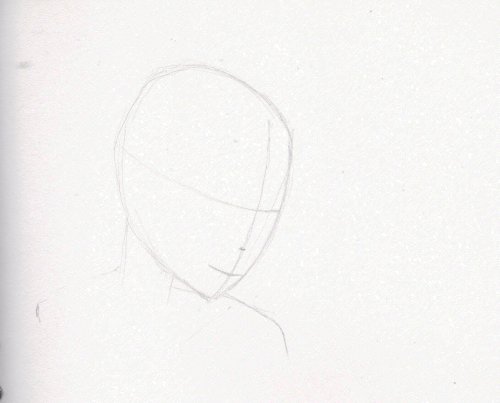
Draw your guide lines
Next we have to draw our guidelines.This project we are doing what we call a 3/4 view so we will start by drawing a vertical line just off from center.Look at the picture for reference.We'll draw that vertical line from the top of the head to the chin.
Now that we have that now we will make horizontal lines for the eyes, nose and mouth.The placement of these vary from person to person but here are some rough guidelines that work for the majority of people you will draw.
Eyes - Should fall roughly half way down the face. Nose- Should fall roughly halfway between the eyes and the chin Mouth - Should fall roughly halfway between the nose and the chin Ears- Should start about the same level as your eyes and should end roughly the same level as your nose
Once again keep these lines light.They are dark here only to help with this tutorial.
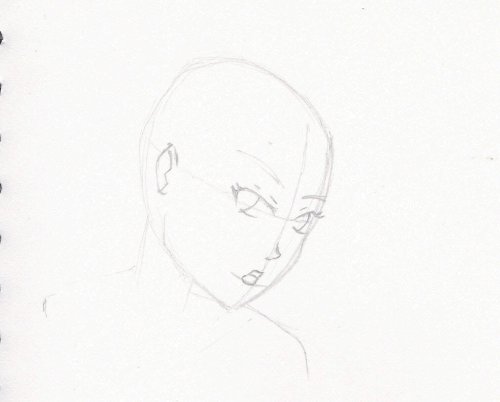
Show me what you got
Alright time to put those guidelines to work.There is no real shortcut to this step.You're going to have to draw those eyes, that nose and that mouth The hardest part is placement which if you've followed the tutorial up to this point you have it.Remember keep your lines light, you're not committing to anything yet.If something is out of place since you have been drawing light you can erase it and place it closer to where you want it
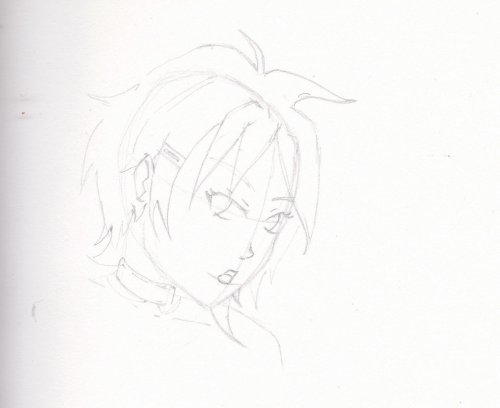
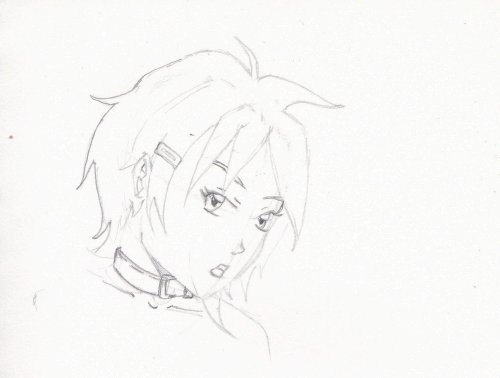
Accessorize People Accessorize
At this point I usually start with the hair.Hair can be a tutorial all on its own.If you need to know how to draw something use google to provide a reference. http://www.disagea.us is a great place that I like to go.You can check out your favorite anime, manga or comic book for reference.Just don't copy use them for a springboard to your own unique work. For this one I used dsagea.us and checked out a few j pop girl bands on google.Don't know who half of these girls are but they sure have some funky hairstyles. This is also a good place to add any other accessories you want your character to have.In my case I added a collar but things like nose rings, piercings and scars are great things to add at this stage.
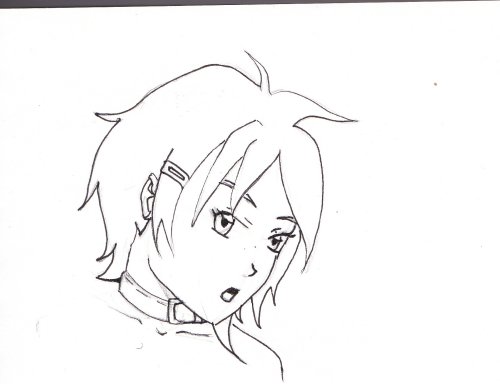
Tighten it Up
Alright right now you should have a pretty well put together character.Now it's just a matter of tightening it up.So carefully take your pencil and darken any lines you wish to keep.Now the tricky part is that you still want to keep the looseness of your work.You want it to look as though you were confident in every line you drew. Once you are done darkening the lines you want to keep now you go ahead and erase those lines you don't want.This is why you keep the lines light until the end.Once you're finished step back and look at your work.Are there any more unneeded lines? Lines you forgot? If so fix it.
I have one more step for you to follow.
Ink It.
The last step (well besides coloring it which I may get into another time) is to ink it.This step is completely optional and given the advent of things like photoshop, Gimpshop and Illustrator maybe totally unnecessary.As I said I like to use the Micron .01 pen.These are good for fine lines like hair, eyes mouth.A bigger pen .05 is good for the outline of the face. Once again the hardest part is going over your lines while maintaining the looseness of the drawing.I find the speed at which you do it will affect how loose your inkwork will appear.If you do the inking real slow your lines will tend to look real stiff but if you do it pretty quickly your inking will look looser.
The only thing that remains is to edit the image to fit into your favorite maker.Check out your system's requirements in the help section of your favorite maker to figure that out.Thanks for stopping by and checking out my tutorials this has been Ovan35 Signing Off.
Well let's see I'm from South Carolina (well actually I've been here since I was 3 years old).True to form I'm working for a major retailer and I'm looking into starting a business of my own.I've been missing for a few months now after having my computer and stuff stolen from me.But I'm back hopefully with a vengence..I love to draw and I love learning new things which is what brought me to game development and rmxp.I've dabbled with various RPG maker programs before but always find myself dropping the projects I stop halfway through.I think I really have something with this project and have been on it far longer than any of my previous projects.
[b]Favorite Food: [/b]Sweet and Sour Chicken
[b]Hobbies:[/b] Drawing and Game Programming
[b]Favorite Movie:[/b] Demolition Man (Simon Phoenix is the sh**),Close second is the first Spider-Man movie I'm a action junkie
[b]Favorite TV Show:[/b] Naruto Shipuden, and Smallville (haven't seen it in awhile though)
[b]Things I hate:[/b] overly cheerful types (camp counselors are hellspawn I tell ya),People that have little to no manners or concern for anyone but themselves (unless in anime or a game then I love them),having to repeat myself more than twice.
[b]Things I love:[/b] The cool, calm, collected types in Anime you know like Ovan(.hack/ roots),Seshomaru and Naraku (Inuyasha).Maybe because I'm the opposite of that.I find it interesting to have a person be so calm no matter what the danger and ALWAYS have a plan.
Yeah... so? This tutorial is titled how to draw a character profile. Some people will probably say that you should scan it when the sketch it complete then continue it digitally, eg the inking.
If you need to digitise it, use a scanner or camera and edit it in whatever photo editor you've got. There are plenty of good programs out there to use for inking and colouring--I use Paint Tool SAI myself, which was $60. I also own a copy of Photoshop CS6, which is always good for some editing and vectors.
You don't even need a tablet to make good digital portraits. I know a lot of great digital artists who use only mouses.
Yes Space Wolfie you can put it to computer and do all the steps I've done using a stylus and a nice digital editing software like photoshop, or free alternatives like gimpshop instead of regular pencil and paper and then digitize it. I showed you how I do it, which doesn't mean it's the only way. But if you're new to drawing and want to make a character profile this is one way to accomplish it. I choose the more traditional paper and pencil because that is what I'm most comfortable with. But if you feel you get better results by doing it straight digital feel free, the steps are roughly the same.
Quick Reply
Guest
Success!
Thank you for subscribing. We've sent an email to your address so you can confirm your subscription.
Quick Uploader - .jpg, .jpeg, .gif, .png or .zip
The quick uploader is for uploads that you can upload on the fly without ever having to reload the page. Simply upload a file and you will get a link.


8 Posts
237 Points
The whole point of making a character portrait is to put it on the computer and use it not to look at it being pretty...
8 Posts
237 Points
I need to digitize it
5,396 Posts
3,746 Points
Yeah... so? This tutorial is titled how to draw a character profile. Some people will probably say that you should scan it when the sketch it complete then continue it digitally, eg the inking.
170 Posts
629 Points
If you need to digitise it, use a scanner or camera and edit it in whatever photo editor you've got. There are plenty of good programs out there to use for inking and colouring--I use Paint Tool SAI myself, which was $60. I also own a copy of Photoshop CS6, which is always good for some editing and vectors.
You don't even need a tablet to make good digital portraits. I know a lot of great digital artists who use only mouses.
30 Posts
98 Points
Yes Space Wolfie you can put it to computer and do all the steps I've done using a stylus and a nice digital editing software like photoshop, or free alternatives like gimpshop instead of regular pencil and paper and then digitize it. I showed you how I do it, which doesn't mean it's the only way. But if you're new to drawing and want to make a character profile this is one way to accomplish it. I choose the more traditional paper and pencil because that is what I'm most comfortable with. But if you feel you get better results by doing it straight digital feel free, the steps are roughly the same.