CrimsonInferno 35 Report post Posted July 24, 2012 (edited) Hey guys! Working on a new logo for my game. Wanna see what you think. The moon was created in GIMP, font made in Photoshop--used the GunSlinger tutorial. I was also thinking this would be the new start of screen:New: Edited June 9, 2013 by CrimsonInferno Share this post Link to post Share on other sites
Tomo2000 60 Report post Posted July 25, 2012 Welcome back Crimson!! And that's amazing! How did you do that? Share this post Link to post Share on other sites
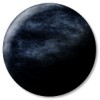
CrimsonInferno 35 Report post Posted July 26, 2012 Thanks Tomo! Took me all day 'cause saving wouldn't save my layers. lol The moon, or the font? For the font, I linked to rgangsta's tutorial, which is amazing. For the moon, I opened up a canvas in GIMP and made it square. You can make it as big as you want, as long as its square. So for me, I did a 1024x1024 canvas size. Next, open a new layer and call it "Surface", then go to Filters > Render > Clouds > Plasma. Set this to 4.0 and then "randomize" and then hit okay. Go to color > Desaturate > color > color balance and add a tint a blue if you want it to look like our moon (I did more blue and messing around here to get mine to be the color it is). Next, make another layer and call it "Clouds" then go to Filters > Render > Clouds > Plasma. Set this to 4.0 and then "randomize" and then hit okay once more.You want to Desaturate this layer once more. After that, go to Filters > Distorts > IWrap. In here, you want to warp the picture a bit by using these options: Move, Swirl CCW, Swirl CW. Once you have something you like, hit okay and let it rework the image. Now make two new layers (name them anything, doesn't really matter). On the first layer of the two, go to Filters > Render > Clouds > Solid Noise. Set the Solid Noise's detail to 15 and turn on the randomize option. Then go to the layer above this one and repeat the Solid noise step, and then change the layer to "DIFFERENCE" and it should look blackish. Now merge this layer down with the one below it. Now invert this, and the image should look white-gray. Then go to Filters > Map > Map Object. Change the option "Map to" to "Sphere" and check the "Transparent" option. Go to the second tab and change the option to "No Light". Now hit "okay". If your sphere comes out looking weird, its 'cause you didn't make the image square, but if its fine, move on. Now go to the layer below this one and repeat the "Map Object" filter, and then again to the layer below this. In all, you should have three layers now with "moon" sphere renders on them, and one layer below it all with your background color. Now go to the top layer, switch it to "OVERLAY", and then go to the layer below this one and set it to "MULTIPLY". Now make a new layer, call it "Shadows" and put it above everything else. Now go to the layer below this one, right click it and click "Alpha to Selection" and then select the "Shadows" layer and then go to your gradient tool and make sure its Black > Foreground and White >Background, then go to the little tool box for it and select "FG to Transparent" option. Now with the gradient tool, go to the moon render and give it some shadows. Its hard to explain this, but for me, I put the shadow on the lower right part of the moon and the light on the top left. Next, make a new layer and call it "highlights" and then select your "CIRCLE" tool, the one that makes circles, and then switch the mode to the third type, called "subtract from current selection". Now you want to make a circle and cut out half of the moon with it, leaving only a piece of it left, to make the "light" of the moon, e.i the part of my moon where the light is shined upon it. Now put WHITE on the FOREGROUND and BLACK on the BACKGROUND for the gradient and then do the same thing you did for the shadows for the light. Then go to Filters > Blur > Gluassian Blur and set this to around 20 and then hit okay. Duplicate this layer and move it around a bit or mess with it until you get what you like out of it, and then delete the background layer with the background color on it. And then go to images > merge visible layers. Now you should have one single layer with the moon on it. There ya go! You have a moon render. Also, worked on a new title screen for my game. The old one looked like this one here, but here is the new one. Did it all in GIMP. 1 Tomo2000 reacted to this Share this post Link to post Share on other sites
Tomo2000 60 Report post Posted July 27, 2012 That's awesome, Crimson! Share this post Link to post Share on other sites
CrimsonInferno 35 Report post Posted July 27, 2012 Thank you Tomo! :D I hope to bring in some updates for Tyn (red headed sprite) and the girl soon. I spent all day working on my game so I didn't get to work on them today like I hoped. xD Share this post Link to post Share on other sites
Noah918 1 Report post Posted July 27, 2012 I thought the originals for both looked pretty good too... Share this post Link to post Share on other sites
CrimsonInferno 35 Report post Posted July 27, 2012 They did looked good, mostly the title I think, but the updates seem more "gamey" (the others were pretty plain), I think. Plus I'm not using other people's stocks anymore. xD Share this post Link to post Share on other sites
Noah918 1 Report post Posted July 27, 2012 (edited) Well I can understand that. I am definitely a fan of the sun rays... Edited July 27, 2012 by Noah918 Share this post Link to post Share on other sites
CrimsonInferno 35 Report post Posted July 28, 2012 An update on Tyn. I could not find my original file of Tyn, so I lost the sideview updates for him and had to start anew. This is what I have so far guys. Does it look like it goes with his front view? Share this post Link to post Share on other sites